Artifact Challenge Scenario
7.2 added a new artifact appearance, and locked it behind a challenging solo scenario which is only active for a few days at a time. While you have to do the scenario alone, you will be accompanied by three AI players. Think of them as really bad pugs. Unfortunately you can not sub them for dying for the hundredth time. You can find the challenge at Deliverance Point on the Broken Shore and you should be 900+ ilvl before jumping in (unless you are some kind of Druid messiah). If you fail at any stage, you have to start again from the beginning.
How do I enter?
Your region needs to have an active Mage Tower, and you need to have completed the introductory Broken Shore quests. You can start the scenario by talking to War Councillor Victoria. The first entry is free, but subsequent attempts will cost you 100 Nethershards each.
Stuff you should bring
- Drums of the Mountain (This is a huge buff for your party, and will get you through particularly tricky waves)
- Flasks
- Your choice of food buff, and optionally a Rune.
Legendaries
Your legendary choices are not that important here. I personally used Ekowraith and Dark Titan’s Advice but Prydaz and Velens are likely stronger choices if you have them.
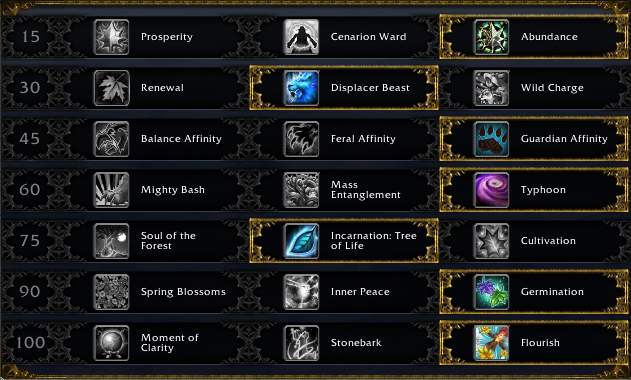
Recommended Talents

The scenario begins with a fight against several waves of generic undead mobs. Contrary to expectations, this is the hardest stage and you can expect a large number of your wipes to occur here. The last two waves are the most difficult, and you should ensure your major cooldowns are up for them.

Risen Arbalest (Archer)
Will fire arrows at random party members dealing moderate damage.
Special Ability: Mana Sting. Will fire a mana draining arrow in a straight line marked by a blue arrow. You should stand behind an ally to make sure this doesn’t hit you since it drains all of your mana!
Risen Mage
Will cast Arcane Blitz at random party members dealing large burst damage.
Special Ability: Casting Arcane Blitz will give him a buff, increasing his damage by a large percentage. If you interrupt his cast the buff will fall off. Our best interrupts are Typhoon and Mighty Bash.
Risen Soldier
Will focus the tank when not casting one of his two abilities.
Special Ability 1: Knife Dance. This is identical to the Knife Dance from Blackrook Hold except it cannot be outranged. You can either heal through it or interrupt it.
Special Ability 2: Fixate. The soldier grows in size, and will follow you around. You can either tank the hits in Bear Form, or use Ursol’s Vortex to keep your distance.
Toughest Waves
Mage, Warrior, Warrior
Begin the round by standing on where the Mage will spawn. This will force the two soldiers to group up with the Mage and allow Typhoon to hit all three. You want to interrupt the two knife dances, and an Arcane Blitz with it – early in the phase. The two scouts will fixate you soon after and you should Vortex before running or blinking away. You should be able to stabilise from here however you need to keep everyone topped off since the damage in this phase is very high.
Mage, Warrior, Archer
This is a very tough, bursty pull and I strongly recommend using Tree of Life and a Potion of Prolonged Power as the phase begins, along with your Drums. Stack the mage and scout on top of each other so that you can get twice the value from your Typhoon. Remember to continue to dodge the Mana Sting. It will ruin your day.

Stage 2 is a freebie. You literally just have to walk to your allies. Use this opportunity to drink to full.

Stage 3 is in multiple parts and offers up a range of reasonably easy challenges. There are Unstable Fel Orbs spread around the area. You can one shot them with Moonfire but they will respawn 5 seconds later. Clear these as you go.

- First up, a room full of eyes. They deal significant damage when they die, so you will want to kill them one at a time. Sunfire / Moonfire / wrath is plenty but I don’t recommend DoTs on any more than one mob at a time.
- Next, you’ll have to kill a Felguard and his three Bat cronies. You should see best results by pulling the set into the room you killed the eyes in. HoT yourself up, apply Sunfire / Moonfire to all four and then drop to Bear Form and thrash until the mobs die. This should be an easy pack.
- Up the staircase you’ll see four dying ally ghosts and an Archer. Dispel the feared ally and then get your HoTs rolling on the three other ghosts. You need to heal them all to full, and you should do so before engaging the archer. If one of them dies to the burn debuff it’s almost certainly a wipe so get to work early.
- Once you’ve healed all three ghost allies to full, you should engage the Archer. Burn it down with Moonfire / Sunfire and hide behind your ally ghosts when it casts Mana Sting.
- Next, a big collection of Fel Orbs. Sunfire is the best way to clear your way through. Make sure you click to open the door at the end quickly after blowing up the last Orbs or they’ll respawn while you’re fiddling with the door latch.
- Finally, you’re greeted with a Dread Corrupter and more eyes. This is the last pack you have to clear before the timer ticks down. Keep HoTs on yourself, but otherwise this should be an easy clear so long as you don’t kill multiple eyes at the same time.

Phew, another freebie. Take this opportunity to mana up. There is no time limit to how long you can wait here, so ensure you let all of your cooldowns (including Drums) refresh. You can also use a tome here and respec if you feel it’s necessary.

Ok this is a bit of a tough one. Your allies are going to turn on each other, and will take reasonably high damage. You will be juggling them with healing spirits that track across the room. The objective of the stage is to heal eight spirits to full before they reach the boss. They travel in waves of three and you have a short gap between waves. Any spirits that make it to the boss will appear as enemies in the next stage so you don’t want to miss more than one or two. Spirits have 2.5 million health.
- Grannie or Callie will take the brunt of the damage and it tends to be just one of them getting smashed at a time. They are great candidates for Lifebloom.
- You take no damage yourself in this phase, and so you should contain your HoTs to your three party members.
We are going to get our eight spirits healed in the first three waves like so:
- First wave: Pop EoG as the spirits spawn. Rejuv two of them, cast Wild Growth, and spam Regrowth to heal them to full. We are ignoring the third.
- Second wave: Pop Tree of Life as the spirits spawn. Wild Growth -> Rejuv -> Regrowth should heal all three to full. It isn’t the end of the world if you miss one here.
- Third wave: Cast Wild Growth and then Tranquility. It will heal all three to full.
- Fourth wave (if you missed one): Cast rejuv on one spirit and then Regrowth it to full. As soon as you have the eight you need the stage will end and the other spirits will disappear.

Quick, sneak in a drink. You’ll have about 20 seconds of rest to return to full mana. This stage is kind of optional – you’ll have to fight any spirits that you let the boss absorb in the last stage. Hopefully you only missed one or two mobs and you can use the same strategies as stage 1 to take care of them. Remember to use your Typhoon to take care of the Arcane Blitz / Knife Dance. As soon as all of the spirits are dead we transition immediately to…

Lord Edris Thorn
HP: 72 million.
Special Ability 1: Ignite Soul. Apparently Lord Edris here has been taking tips from Nightbane. Ignite Soul lasts 8 seconds and then explodes – dealing your current health as damage to the rest of your party. Similarly to Nightbane you should find a pool to stand in to help manage your HP but be careful – they deal heavy damage.
Special Ability 2: Heroic Leap. Now he’s copying warriors. Edris will randomly jump on top of you and spawn a new Fel Pool throughout the encounter. This often follows the expiration of Ignite Soul.
Strategy
- Keep Lifebloom on the Jarod but otherwise your party won’t be taking too much damage here.
- The fight is entirely won or lost on how well you control your own health bar, and how quickly you can kill the boss. Use the fel pools to drop yourself below 50% before Ignite Soul detonates. Immediately afterwards you should go into Bear Form in anticipation of Heroic Leap.
- Use Displacer Beast to reposition yourself if you’re trapped by pools.
- Keep your DoTs up on the boss at a minimum. The fight is a DPS-check and a moderate contribution will greatly improve your odds.
- The scenario only fails if one of your allies die. If you run out of room and are going to die, consider dropping a full HoT stack on Jarod first. Your party will happily make up for being useless in Stage 1 by killing the boss without you from ~20% health.
Prefer a video? Tyrant from Proudmoore has you covered.