Castle Nathria Ramp Guide II – Discipline
You can find part I of this guide here where I cover the first five bosses of the raid. Here we’ll go through Artificer Xy’mox, Council of Blood, Sludgefist, Stone Legion Generals and Sire Denathrius and discuss the best times to ramp in both heroic and mythic. The guide will remain Spirit Shell focused for now, but with the recent 20% nerf Evangelism might also be worth a look on a few select fights. We’re going to skip the “setup” section since you can flick back to part 1 for a refresher if you need it.
Artificer Xy’mox
Mechanics & Debuff healing are king.

Debuffs to add to your healing frames: Withering Touch
Key Ability Timers

Artificer Xy’mox resets the timer on Glyph of Destruction every time you push him to a new phase. This makes it a little awkward to ramp for, but you should find your guild pushes at a very similar time every pull which does make it a little consistent once you get used to it. Hyperlight Spark will also eat a lot of your Spirit Shell which means it’s kind of hard to miss all mechanics and get no value regardless of when you ramp.
Notes
- Venthyr: If you fall behind during the annihilation “suck” then you can use Door of Shadows to port back out. Time it so that the explosion is 2-3 seconds away.
- There are certain points in the fight where you can be targeted by a ghost, or have to run out with a portal while you are ramping. This is really not a big deal, and while you should use Penance, Purge the Wicked while moving, your absolute focus should be on the mechanic. Xy’mox is not a healing heavy fight and it doesn’t matter if you lose an entire ramp even. Mechanics come first.
- The Withering Touch debuff is extremely dangerous and will likely be the sole cause of healing-related deaths & wipes. It will overlap with other mechanics and players will die from above half health. Keep them healthy.
- When it is on you: Cast Desperate Prayer and Fade (with the conduit). Have your Healthstone / Health potion ready. If the raid is struggling then you can self-cast Pain Suppression to be safe. This is not a fight where you want to check after raid and have 0 Pain Supp casts.
- When it is on others: If you are ramping make sure they are included in your ramp targets. If you are not ramping, cast Shadow Mend where necessary. You are not the best healer for large single target debuffs but you should definitely be contributing.
Council of Blood
Spirit Shell makes Council of Blood significantly easier, and while sometimes annoying to play this is a very good fight for us.
Debuffs to add to your healing frames: Drain Essence
Key Ability Timers – Mythic

You will ramp for the first Dancing Fever before the pull starts. Aim to be casting your Radiances as the boss is pulled.
Heroic
Timers for heroic not pictured, as there aren’t really any key mechanics you should ramp for. Instead aim to ramp on cooldown to absorb AoE damage, except when a boss is near 50% (so that you don’t ramp into the intermission). If you kill Frieda second or third you can also ramp for Prideful Eruption which is a large raid-wide AoE.
Bonus Notes
- Ok let’s talk Dutiful Attendants. They’ll spawn at set times through the fight and will make whichever boss is lowest on health completely immune to damage. This means that you will do no damage, and as such no atonement or spirit shell healing if you are hitting that target. The easiest way to play this is just to swap to a different target when they spawn. If the raid is currently hitting Frieda then swap to Niklaus or Stavros. If you’re on the last target then swap to a waiter if available. This lowers your effective DPS by a moderate amount but makes the fight much easier to play.
- Mythic: The timers are tight, but it’s ok if you are still completing your ramp as the Dancing Fever goes out. You’ll still make it significantly less dangerous by absorbing the later jumps. You get a chance to reset your timers a little bit during the intermission dances which will let you prep for the next one on time if you’ve fallen behind.
- Mythic: Early in progression you might get two Dancing Fevers before the first dance intermission. You don’t need to ramp for the second one since that will basically always be a wipe and you won’t get it once your DPS optimize a little. Your raid can buy more time to phase by kiting the first boss you kill away from the second attendant. Instead of ramping, hit the boss hard to help phase her quickly.
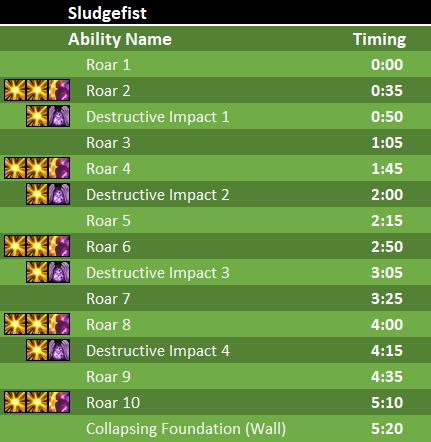
Sludgefist
Possibly the most fun boss in the raid
Debuffs to add to your healing frames: None, though you could track the stun to save people who get hit.
Key Ability Timers – Heroic & Mythic

Don’t bother committing any healing to the first roar at the start of the fight. Your GCDs are better spent DPS’ing the boss and it’ll be naturally healed by low cost abilities like Efflorescence and Healing Rain.
Bonus Notes
- All of the damage on the fight is physical, and we wear cloth which means we are in frequent danger. We can mange that by using Desperate Prayer heavily, and by using Fade often with the conduit. Shadow Mend yourself if you need it before a pillar and keep your healthstones and health potions close.
- I personally found the Feather mobility to still be pretty useful here, but Masochism is also an acceptable choice if you don’t find yourself casting Angelic Feather much.
Stone Legion Generals
Starting Stone Legion Generals? I’m sorry to hear that.
Debuffs to add to your healing frames: Crystallize, Heart Rend, Heart Hemorrhage
Heroic

Mythic
Crystallize occurs slightly more frequently than once a minute, but does reset at the start of phase 2 (when General Grashaal joins the fight). That means you can skip ramping the second Crystallize in the intermission and then start over very early in phase 2. Specific timers will vary depending on strategy and you won’t particularly need them. You will ramp for every Crystallize you are able, skipping one to reset your cooldowns as it becomes impossible to do so.
Bonus Notes
- Some strategies will have you grip whoever gets the second crystallize in the intermission. Make sure you can see the debuff clearly on your frames, and then grip them just after the stun lands (the meteor will hit where you gripped them from rather than where they are post-grip).
- Outside of your Spirit Shell ramp you will still have to heal those with Heart Hemorrhage, and anyone with more than one stack of Wicked Laceration. Make sure you can see both on your frames, and that you look after them if they drop low. It’s not particularly cheap for us to do so, and you’ll do less than other healing specs but should still be contributing. Defensive Penance is also a good choice here. You can Shadow Mend -> Defensive Penance a target to help them through the entire DoT.
- Use Pain Suppression liberally. Anyone with multiple Wicked Laceration stacks + Heart Rend is in a lot of danger.
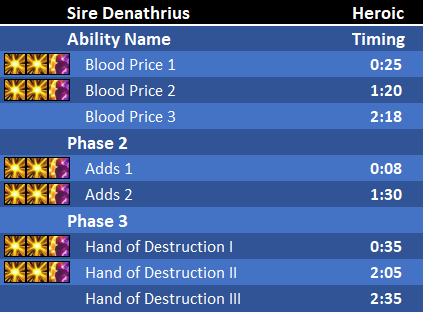
Sire Denathrius
High movement, chaotic, and a near perfect fight. Mythic coming soon.
Debuffs to add to your healing frames: Carnage
Key Ability Timers – Heroic

Your phase 1 push timers could differ a little bit depending on which strategy you are using. If you play an extra two cleansing pains then you can fit in an extra spirit shell, but this should be a rare strat this late in the patch. In phase 2 you are ramping for the add spawns. You can start when the spawn and you’ll cover a lot of the damage. The first of which is immediately after you drop and then the next is almost ~90 seconds later. Spirit Shell will sit off cooldown for a little bit but that’s ok.
Bonus Notes
- There’s a lot of movement in phase 3 in particular. It’s not too bad once you get used to it. Cast power word: shield to ramp on the move, and plant for your Radiances and damage spells whenever you are able. The healing requirement isn’t particularly big here, and even just getting in your Schism -> Mindgames -> Penance is enough to cover the most dangerous moments.
- Mechanics come first. Don’t sit too long in a swirl or a Massacre blade to try and finish your cast sequence. Move to safety and then finish your rotation.


the timers are where we are meant to press spirit shell right?
Not quite. The timers are when the damage event occurs. You’ll generally want to press your Spirit Shell button 10-15 seconds before where possible.
Some are very tight like the Dancing Fevers after intermission on Council of Blood Mythic. For those you just ramp as early as you’re able to.
Hey, I think there is a problem I’m the timings : Dance fever 2 is 3 seconds later (1:35) tham Dance Fever 3 (1:32)
Cheers. Big typo there. I’ll get that fixed.