Castle Nathria Ramp Guide I – Discipline
Castle Nathria opens Shadowlands with a fantastic ten boss raid in which Disc Priest reigns as a top healer spec. The key to getting the spec right is to perfect your Spirit Shell rotation, and then to know which mechanics to use it against. We’ll be discussing the latter heavily through this guide. I’ll be assuming you have reasonable knowledge of the spec already and if you’re new I’d highly recommend getting started with the Icy Veins Discipline guide. If you have multiple Disc Priests in your team then the second one will have to play slightly differently, and I’ve tried to highlight that on a boss by boss basis. This is part 1 of a 2 part guide. You can find part two here.
What to bring with you
You’ll want the Clarity of Mind legendary, Exaltation Potency Conduit and you are preferably Venthyr though other Covenants will play similarly with some variation in the size of your Spirit Shells.
Spirit Shell Ramps vs Mini Ramps
Throughout the guide you’ll read of both Spirit Shell Ramps and “Mini-ramps”. They should be made up of the following abilities:
- Spirit Shell Ramp: Invest two Radiance charges, Spirit Shell, Mindbender, Schism, Mindgames, Penance and Mind Blast.
- Mini Ramp: Invest one Radiance charge, Schism, Penance and optionally but frequently Mind Blast.
Shriekwing
This is a pure mechanics fight and while you’ll perform very well on the healing meters you should prioritize learning the intermission.

Average Fight Length: 3-4 minutes (Heroic), 5-6 minutes (Mythic)
Debuffs to add to your healing frames: BloodlightKey Ability Timers – Heroic & Mythic

After the intermission the timers basically reset so you’ll start over with Shells on Wave of Blood 5 and 7. The timing on your shells here will be tight, and you should watch your cooldown timers closely. If you have a second Disc Priest then they will Spirit Shell Wave 2 and 4, and mini ramp 1 and 3. Doing this leaves very little healing for your other healers. A great opportunity for them to get used to their DPS rotation.
Notes
- The first Wave of Blood occurs early so you will want to start getting atonements out on the raid before the pull.
- You will frequently be ramping and even building shell while moving. Save Penance for movement and remember that a Purge the Wicked refresh while moving is a fine use of a GCD.
- Start your ramp for the 5th Wave of Blood shortly before the intermission ends (~5-6 seconds before is plenty).
- You can’t do much during the intermission but feel free to throw defensive penances and Shadow Mends if they’re necessary. Incoming damage should be quite low if the raid’s managing their stacks well. You also have Barrier you can use if it’s starting to look dire.
Huntsman Altimor
This is an awkward one for Disc, with our healing on the Souls being poor though you’ll still contribute well to the incoming raid damage.
Average Fight Length: 3-5 minutes (Heroic), 5-6 minutes (Mythic)
Debuffs to add to your healing frames: Vicious WoundKey Ability Timers – Heroic & Mythic

Phase 1
The timers on this one vary quite drastically in some cases, but Spirit Shell has a long enough duration that we can cover most discrepancies. Commit your first Spirit Shell ramp to the Vicious Lunge ~24 seconds in. If you ramp a little late then you’re also likely to catch Sinseeker in it.
Phase 2
Ramp with the objective of covering the AoE damage that coincides closely with the first and third Rip Soul. This should be close to casting Spirit Shell on cooldown. It’s not high value, nothing you do in this phase will be. Remember to cast Pain Suppression on the tank before a Rip Soul. The health of the soul it spawns is based on how healthy your tank is at the time.
Phase 3
This is an incredibly high damage phase, but it’s all triggered by tank movement. Build a big shell on cooldown, and call to your tank when you’re finished ramping. They can use the massive shield to reset the stacks on the dog by moving it a lot.
Bonus Notes
- We’re not great at healing the souls. They don’t stay up long enough for Atonement to do anything and Shadow Mend isn’t the best tool in your raid comp for it. If you’re between Spirit Shells then you can commit a Radiance.
- If an add gets a cast off in phase 2 the raid will take heavy AoE damage. This shouldn’t happen, but progression is never perfect. This is an ideal time to drop barrier. If your raid plays it correctly then drop barrier in phase 3 instead to cover movement.
- Phase 3: Pop a defensive and run out when you get Petrifying Howl
Hungering Destroyer
An all star Disc fight
Average Fight Length: 4-6 minutes (Heroic), 6-7 minutes (Mythic)
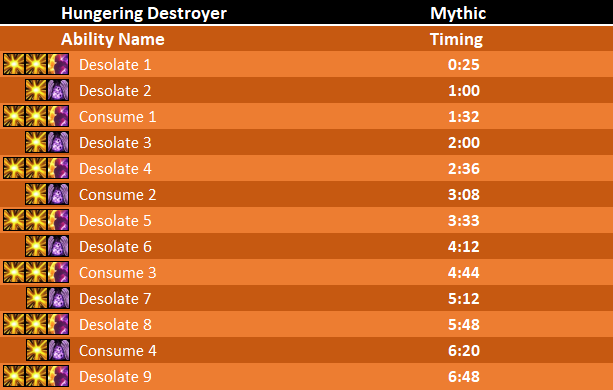
Debuffs to add to your healing frames: Gluttenous MiasmaKey Ability Timers – Heroic & Mythic

Ramps here are very deliberate, and the timings are consistent and easy to play. It’s key that you have atonement on all four Miasma targets as part of your ramps. Power Word: Radiance won’t bounce to them, but it you cast it on the person then it will so you can use your radiance charges to prep the last 1-2 targets.
Bonus Notes
- You’ll be tempted to spend extra mana putting Power Word: Shield on Miasma targets in between your ramps. This is often a bad choice that attempts to paper over mechanical mistakes with a very minor absorb. Consider it a last resort only.
- The Fade Endurance conduit is of particularly high value here since we’re very light on defensives that work during Miasma. Remember to be using Pain Suppression actively too.
- You’ll drop Barrier during every second Consume. Your raid leader will tell you which.
Sun King’s Salvation
Alright, let’s talk.
Average Fight Length: 4-5 minutes (Heroic), 5 minutes (Mythic)
Spec Choice on Sun King
This is both not a good Disc fight, and also one of the strongest Holy Priest fights the game has seen in several expansions. I’m recommending you swap specs for it to the point where this portion of the guide will actually discuss Holy strategy rather than Disc. Swapping for the fight can easily half the number of pulls you’ll take to kill the boss. Think of this as a bare minimum you need to get by as Holy on the fight.
What you need for Holy
- The Guardian Angel talent. Guardian Spirit is kind of the reason you are going Holy for this one and reducing its cooldown gives you better timings on the Mythic speed strat and just more GS’s overall in heroic.
- The Lasting Spirit Potency conduit. It doesn’t matter what level it is. The extra two seconds on Guardian Spirit is crucial to the point where nothing else is competitive. Resonant Words is a strong second conduit if you have two slots.
- I personally crafted a rank 1 Holy Legendary (Flash Concentration) for the fight since I enjoy the spec anyway, but you shouldn’t consider it mandatory and wearing your highest ilvl Disc legendary is also fine (something like Twins of the Sun Priestess is ok too if you already have it).
- Your talents are reasonably flexible as Holy but this should be a good starting point for you: https://www.wowhead.com/talent-calc/priest/holy/mQAM. This is far from the only viable build and the only talents that are 100% locked in are Guardian Angel and Shining Force. You can read more about Apotheosis vs Salvation below.
Bonus Notes
- You can bounce Circle of Healing off Kael to heal the raid if multiple people are injured.
- Divine Hymn gives everything a 10% healing buff, including Kael. It will also fill any Essence Fonts that are active. It does not buff the Essence Font or Pedestal healing, but will buff all of your other healers. They’re going to love you.
- Apotheosis and Salvation are both great talents, but I’d recommend at least starting with Apotheosis which is quite a lot of healing on Kael himself. If you’re beating the checks by a lot then Salvation let’s you top the raid going into the final Shade phase as well as auto-topping the Essence Fonts.
- You can definitely do semi-decent healing to Kael, but your other healers will do much more. That’s fine, you are in the raid for your utility. That does mean though that you should be responsible for filling the Essence Font containers when they’re up so that your single target blasters don’t have to switch. Dropping a Holy Word: Sanctify on them will do most of the job.
- Your Guardian Spirit will be assigned by your raid leader, but expect your first to be very early in the fight, and your second to be during the healing shield (mythic) or early in phase 2 (heroic, so that you’ll get a third).
- Use Shining Force to knock back the Phoenixes. Your raid leader might assign you a specific moment and position for it, but if not use it as they encroach on the raid.
Inerva Darkvein
Very much a DPS race at this point and Disc brings a lot for free. Remember that the fourth time you get orbs during a ramp.
Average Fight Length: 4-6 minutes (Heroic), 5-6 minutes (Mythic)
Debuffs to add to your healing frames: Concentrated AnimaKey Ability Timers – Mythic
The timings here are not exact and will depend on how quickly you push the boss. You’re also not ramping for Orbs, but should be aware of the rough timings.

Your role here is really just to reduce incoming damage while blasting DPS. The healing check isn’t particularly difficult, and mechanical errors will just lead to death most of the time which means incoming damage is consistent. Instead of ramping for specific mechanics you will instead just aim to maximize the number of Spirit Shell casts you get over the fight. We’ll do this by ramping before the fight starts and hitting our first Spirit Shell 4-5 seconds in, then we’ll cast it every time it comes off cooldown. Similarly you will cast your mini-ramp as Schism comes off cooldown. You can hold for a few seconds if there’s a set of soaks going out.
Alternative Timings
The alternative to an early ramp is to start when the orbs wrap up around ~35s in. This has the advantage of increasing the power of your first ramp, while potentially costing you one at the end depending on kill time.
Ramping in Heroic
Heroic is easier to play than Mythic because the damage comes in much more pronounced waves. It’ll continue to increase until you open a container every ~25% and you can aim at ramping toward the end of each “mini phase”. The timings above are vague because it’ll depend on when you open canisters, but your ramps don’t have to be very specific here. So long as you are spirit shelling toward the end of each container you’ll waste none and cover the most dangerous part of the fight. There aren’t specific timings since it depends on your DPS but a good starting point is to cast your first Spirit Shell ~20 seconds into the fight, and then off cooldown. Feel free to adjust slightly if you are pushing faster or slower. You are trying to capture the “end” of each of her containers.
Bonus Notes
- When you’re targeted with the Orb mechanic you’ll need to make sure you keep yourself alive while running to the correct point. Use Desperate Prayer, Fade (with the conduit) and defensive Penance to keep yourself healthy and remember your health stones / health potions. Never walk between the beam that connects the orbs later in the fight. Dying to this mechanic before connecting the orbs is often a wipe (or a messy battle res) so take your time here and keep yourself alive.
- Allies targeted with Concentrated Anima will take significant damage when it expires. Keep them above 80% life and encourage them to pop a defensive.
- One of your healers will always be chosen for orbs. The fight is usually 3 healed on Mythic which means you are going to get this mechanic a lot.


Nice write up, very helpful!
Awesome guide, any word on the rest of the bosses?
It’s my very next project! Thanks for the support.
Anxiously waiting on part 2. Want to know how you handle them 🙂
Sinful Gladiator’s Prestigious Cloak shows under QELive gear but it seems to be an unobtainable item, unless it’s a 2400 rating reward only? but then I did only select 2100 rating under the upgrade finder.
Cheers. Looking into it. Blizzard might have removed this one from the game before Shadowlands launched.