Tol Dagor Mythic+ Dungeon Guide
Instance Breakdown
Instance Timer: 33 minutes
Wowhead Link: Link
Trash
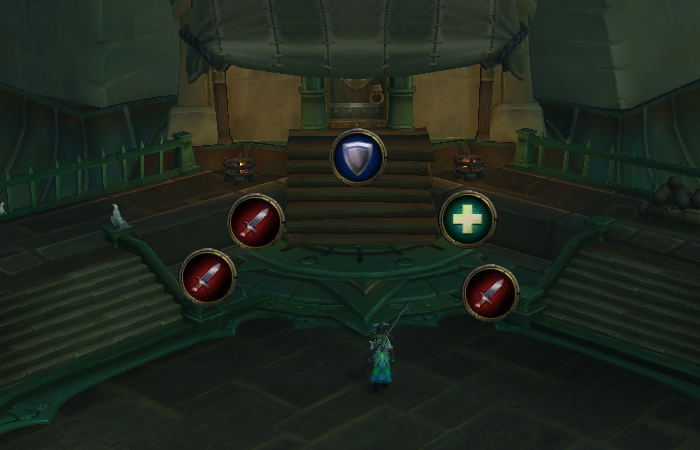
[masterslider id=”28″]Method Dungeon Tools Strings
Classic Path (pictured above): https://wago.io/toldagor
Bosses
The Sand Queen
Give me a second to put Soothe back on my bars

Dungeon Journal+
Sand Trap Magic Damage Debuff (Stun) Dodgeable
Sandstorm AoE Magic Damage
Upheaval Magic Damage Knock Up Dangerous
Itchy Bite (Buzzing Drone) Physical Damage Debuff (Minor DoT)
You should know
- Let’s start with an essential and then dive into some proper strategy. The Sand Traps are giant brown mounds on the ground. If you stand on them they’ll stun you and there’s a reasonable chance you’ll die or owe your healer a beer. Similarly when the Buzzing Drones spawn give the tank half a second to pick them up before you drop all the AoE.
- Sand Traps are always created underneath a player and Drones will spawn whenever she creates a set. It’s therefore better to have your party all stack on top of each other. When the Sand Traps spawn move to a new spot as a team. When the boss burrows separately slightly so that whoever is targeted by Upheaval is able to run from the party before it hits. By doing the fight this way you give yourself much much more room since Sand Traps all end up on top of each other instead of spread around the room. It also greatly reduces the chance you walk over one when running out upheaval because they’ll all be in one place. Yet another advantage is that it keeps the Drones in one place as well and makes it easier for the tank to pick them up.
- Reminder: The boss enrages whenever a Drone dies. You can Soothe this off if you like but only bother if she has more than 3-4 stacks. It’s a very very short buff.
- Defensive: Upheaval does incredibly high damage and when targeted you should pop a defensive as you run from the group. This will actually one shot you in higher keys. Live.
Jes Howlis
This guy lets his brother out of prison half way through the fight. If we don’t arrive does he just leave him in there?
Dungeon Journal+
Flashing Daggers Physical Damage Dodgeable (Line of sight) Dangerous
Crippling Shiv Magic Damage Debuff (Poison, Slow, DoT)
Howling Fear Debuff (Fear, long) Interruptible
Motivating Cry Boss Buff (+10% dmg, stacks) Interruptible
Blade Turning (Bobby Howlis) Shield Interrupt Immunity
Vicious Mauling (Bobby Howlis) Physical Damage Debuff (Stun, long) Interruptible
You should know
- Phase one (we’ll call it the pre-smoke bomb phase) is super straightforward. Interrupt Howling Fear and hide behind a pillar when he casts Flashing Daggers. That’s the entire fight until 70%.
- At 70% the first Worgen boss since Shadow Fang Keep will stun the party and take off down the hallway. AoE down the adds as you chase him and interrupt the Motivating Cry channel as soon as you reach him.
- Phase Two is a little like phase one with the notable addition of his baby brother Bobby Howlis. Bobby is going to smash a Power Word: Shield on himself and then try and mug a random person in your party. You’ll need to damage through his shield and interrupt the channeled cast. It isn’t particularly difficult but you’ll need to do it quickly because it stuns the player and makes them susceptible to Flashing Daggers.
Knight Captain Valyri
Where are these barrels even coming from??
Dungeon Journal+
Burning Arsenal Magic Damage Dodgeable Dangerous
Ignition Magic Damage Dodgeable Fatal
Cinderflame Magic Damage Dodgeable Dangerous
Fuselighter Magic Damage Debuff (Magic, Minor DoT)
You should know
- We’re going to do this fight a little different than you might be used to. Instead of moving all of the barrels out of her fire we’re going to throw them all in one corner and let her blow them up. This is much more efficient from a DPS perspective because we’re not spending so much time moving barrels and it keeps the fight under control from beginning until end. When she goes to blow them up, simply move to the corner on the opposite side. The healer should move as many of the barrels as possible since there is very little else for them to do.
- Obvious Dodge: Cinderflame. This can be fatal and you should be in your ‘safe corner’ anyway so no excuses.
- Healer: Dispel the Fuselighter debuff. There honestly isn’t much else for you to do on this fight anyway so spend the rest of it contributing damage.
Overseer Korgus
IhateyouIhateyouIhateyouIhateyou
Dungeon Journal+
Cross Ignition Magic Damage Dodgeable Fatal
Explosive Burst Magic Damage Debuff (Delayed Damage)
Deadeye Physical Damage Debuff (Deadeye deals +500% damage) Interceptable
Incendiary Rounds Magic Damage Debuff (Moderate DoT)
Massive Blast (Cannons) Magic Damage Dodgeable Fatal
The Basics
- Cross Ignition is marked with big black lines on the floor. You need to rotate around the boss until you’re in a clear space. You have a couple of seconds to do so. It’ll kill you on any reasonably high key.
- The Massive Cannons will also one shot you but by using the Corner Strat below they’ll be unable to hit you at any point in the fight.
- The first Deadeye shot anyone takes is near-harmless. The second is a one shot. The debuff actually lasts for a very long time so you’ll need most of the party to be aware of the ability and actively soaking for each other.
- A more advanced tactic is to use a Demon Hunter to soak every Dead Eye with Blade Dance since the shot is 100% dodgeable (like most physical damage abilities).
The Corner Strat

By using the corner strat you become immune to the annoying boss knockbacks and are permanently out of reach of the Massive Cannons. Tuck in tightly with your backs against the wall and you shouldn’t move. When the Cross Ignition black lines go out rotate around to a safe space. The vision isn’t great in the corner but the advantages are worth it.
Healing Korgus
This boss is tough and I don’t have a secret strategy that’s going to make him easy to heal. Instead we’ll look at where most of the damage is coming from so we can prepare for it accordingly. We’re going to assume your party dodges Cross Ignition, Massive Blast and multiple Deadeyes since if they don’t they’re going to die regardless of what you do.
- Track Explosive Burst on your frames. This is 80% of the fights damage and will go out on three randomly chosen targets at a time. It’ll never target the tank. You can expect them to go out about every twenty seconds.
- If the boss has the Incendiary Rounds buff then they’ll take moderate ticking damage after the blast.
- The tank isn’t going to need you much. They’ll already benefit from any AoE heals you throw out and should otherwise be able to look after themselves.
- Druid Specific: You have four seconds from when the Explosive Burst debuffs go out to pre-HoT. Keep rejuvs on everyone at basically all times and Wild Growth as the debuffs expire. Make sure you’re hidden tight in a corner so that the knockback doesn’t interrupt your casts. Keep Efflorescence down and Lifebloom on yourself at all times. Use Regrowth on anyone below 50% after your Wild Growth cast. Swiftmend is your emergency cast. You’re going to use it if anyone dips below 20% with the DoT still ticking.
- Monk Specific: Renewing Mist on cooldown. Cast Essence Font two seconds before the Explosive Bursts expire and cancel the cast as the damage hits. This will give you double mastery value on all allies as you start spamming Vivify. Don’t cast Soothing Mist before you Vivify. Here we want a Vivify on everyone hit as soon as possible and Soothing Mist is going to slow you down. Remember to use your powerful arsenal of defensive abilities to keep yourself healthy. The fewer heals you require yourself the more you can give your party. This can be a very long fight so if it’s a high tyrannical key consider using Thunder Focus Tea charges on Vivify. The Mastery boost it’ll give you from any Secret Infusion traits is already incredibly strong.


Check out the Underrot | Back to the Compendium | Check out Waycrest Manor